Setting Up PPPoE Internet at Home
Sun, May 15, 2022Last year, we changed our internet service to a Gigabit line. The setup of Gigabit was pretty simple because our Internet Service Provider (CenturyLink) provided a free router. However, I wanted to use our router to ensure we had control over the hardware that performed our network and internet connections. In addition, the CenturyLink router underperformed our own router - the wifi range was too short to supply wifi to our entire home. So I did some investigating into how we could use our own router.
I used this blog post to setup our router and wanted to document my experience in case that site went away.
Initial setup
I thought it would be pretty simple to use our own router because all I had to do was copy the settings from the provided router onto our own router. That assumption proved wrong because PPPoE requires a username and a password for setup. I tried a few ways to pull the password from the provided router and both proved ineffective:
- The user interface for configuration of the provided router was very basic and I assumed that the password was probably just stored in plaintext within the page. I inspected the page and unfortunately the password didn’t seem to be supplied to the router’s configuration UI.
- The router had an option to enable an SSH connection. I enabled that and tried to pull the password from a configuration file but the password was encrypted.
So we were required to call into CenturyLink and get the password for our PPPoE connection.
Router setup
We have an old-ish Netgear AC1750 (R6400) router and these instructions are based on that. Also, as stated earlier, I pulled all of this from this blog post.
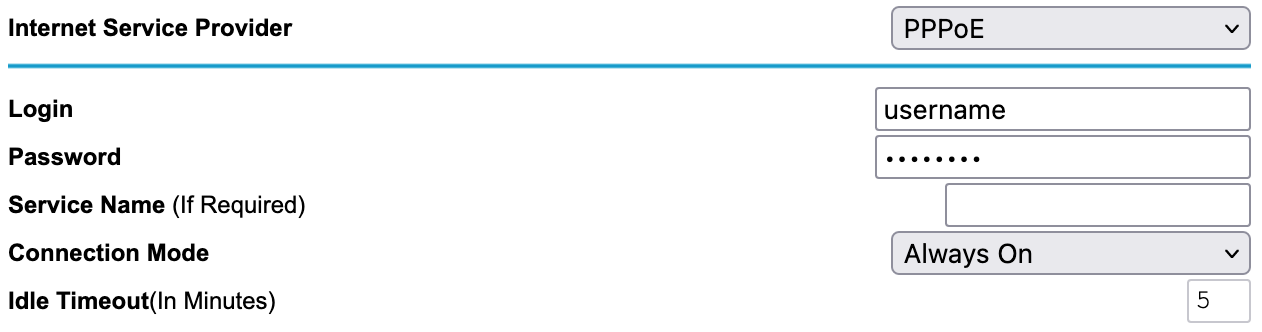
The first step is to update your ISP configuration within the router. Navigate to the Internet Setup settings and update the ISP to PPPoE and input your username and password for PPPoE. Our settings are below:
The next step is to enable VLAN tags and the VLAN ID for it. This was a step I missed and why I need the blog post above. Enable VLAN / Bridge setup from your VLAN / Bridge settings page. Ensure that it’s by VLAN tag group and add the VLAN ID as 201. Our settings are below:
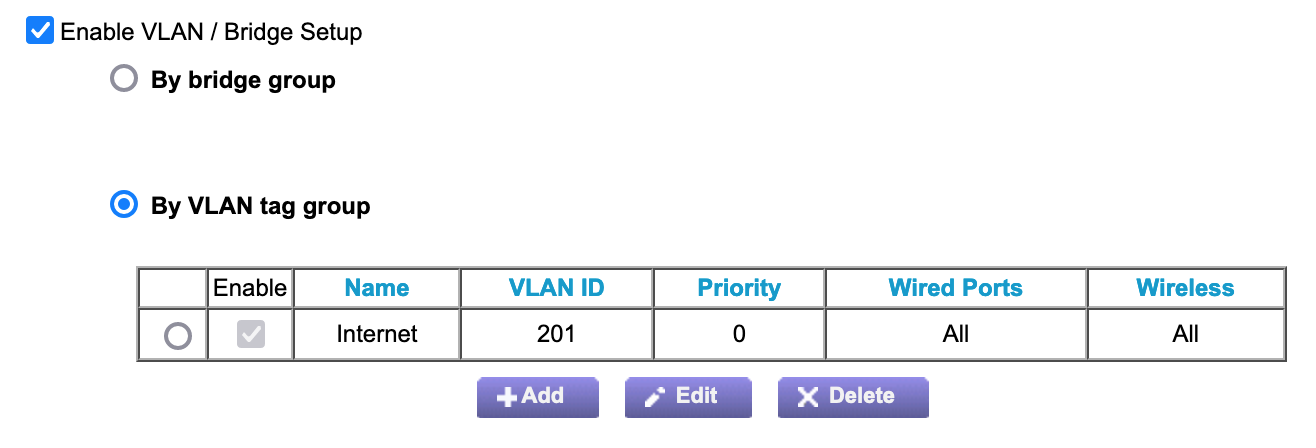
I’m unsure why VLAN and the VLAN ID are necessary but we needed it to actually get our internet connection working.
After these steps, you should be able to connect to the internet through your own router.